🔥 How to Install Solar System at Home in Pakistan (Step-by-Step Guide 2026) 🔥
📅 Last Updated: February 2026
🔌 BREAKING NEWS: Electricity prices have crossed Rs. 55 per unit across Pakistan! 💸 Load-shedding is returning in many areas! 😱 Solar power is no longer a “luxury” — it has become a NECESSITY for every Pakistani household!
🇵🇰 Pakistan Mein Ghar Par Solar System Lagwane Ka Mukammal Tareeqa — complete step-by-step guide in simple English + Roman Urdu, so you can install your solar system without any confusion! ☀️
Yeh sirf guide nahi, aapki solar investment ki complete roadmap hai! 🗺️✨
📚 TABLE OF CONTENTS (Jump to any section) 🔽
👉 Part 1: Pre-Installation Checklist ✅
👉 Part 2: Step-by-Step Installation Process 🔧
👉 Part 3: Solar System Wiring Guide ⚡
👉 Part 4: Net Metering Application 2026 📝
👉 Part 5: Testing & Commissioning 🛠️
👉 Part 6: Maintenance Tips 🧹
👉 Part 7: Common Installation Mistakes ❌
👉 Part 8: FAQs (Real Pakistani Scenarios) ❓
✅ PART 1: PRE-INSTALLATION CHECKLIST (Pehle Ye Zaroor Karein!) 📋
Before you install a solar system, there are 7 important things you must check. These steps will save you from headaches later!
Roman Urdu: Solar system lagwane se pehle ye 7 cheezein check karna bohat zaroori hai. Warna baad mein pachtawa hoga! 😫
📋 Step 1: Check Your Electricity Bill 🧾
First, look at your monthly electricity bill. How many units (kWh) are you consuming? This will determine your system size.
Roman Urdu: Sab se pehle apne monthly electricity bill ko dekhein. Kitne units (kWh) consume kar rahe hain? Isi hisaab se system size decide hoga.
If Monthly Bill Is | Units Consumed | Recommended System Size
Rs. 5,000 – 8,000 | 150-250 units | 2 kW – 3 kW 🏠
Rs. 10,000 – 15,000 | 300-450 units | 3 kW – 5 kW 🏡
Rs. 20,000 – 30,000 | 600-900 units | 5 kW – 8 kW 🏘️
Rs. 40,000+ | 1200+ units | 10 kW – 15 kW 🏢
Expert Tip: Take an average of the last 12 months so both summer and winter consumption are covered.
Roman Urdu: Pehle apna bijli ka bill check karein. Jitne zyada units honge, utna bada system chahiye. Average last 12 months ka nikaalein taake summer-winter dono cover ho jayein. 💡
🏠 Step 2: Roof Inspection 🏢
Is your roof suitable for solar panels? Check these things:
Roman Urdu: Aapki chhat solar panel lagwane ke liye fit hai? Ye cheezein check karein:
✅ Roof direction: South-facing roof is best in Pakistan (maximum sunlight) 🧭
✅ Roof angle: Around 30 degrees is ideal 📐
✅ Shading: Are there any trees or buildings nearby causing shade? 🌳
✅ Roof condition: Is the roof strong enough to support panels? 🏗️
✅ Space required: 1 kW needs approximately 70-80 sq ft of space 📏
Roman Urdu: South-facing roof par panels lagaen ge to maximum generation mile ga. Agar shade hai to output kam ho ga. Roof ki condition bhi check karwa lein taake panels safely install ho saken. 🔨
💰 Step 3: Budget Planning 💸
Here are the 2026 solar system prices (February 2026 update) 📊:
Roman Urdu: 2026 mein solar system ke prices yeh hain:
System Type | 3 kW | 5 kW | 10 kW
On-Grid (No Battery) | Rs. 3.3 – 3.8 Lacs | Rs. 5.8 – 6.5 Lacs | Rs. 8.5 – 10.0 Lacs
Hybrid (With Battery) | Rs. 4.0 – 4.5 Lacs | Rs. 7.75 – 8.5 Lacs | Rs. 13.0 – 30.0 Lacs
⚠️ Important Update: China has ended its export rebate on solar panels from April 2026. Prices may increase further! 📈
Roman Urdu: China ne solar panels par export rebate khatam kar di hai April 2026 se. Is liye rates mein izafa ho sakta hai!
Brand Recommendation: Always choose quality brands like Jinko, Longi, Canadian, Trina for panels. For inverters, go with Sungrow, Solis, Growatt, Deye.
Roman Urdu: Prices panels ki quality aur brand par depend karti hain. Jinko, Longi, Canadian, Trina — yeh ache brands hain. Saste panels mat lena, baad mein pachtawa hoga. 🏷️
🔍 Step 4: Professional Feasibility Check 🔎
Call a professional solar company for a site survey. They will:
Roman Urdu: Kisi professional solar company ko bula kar site survey karwa lein. Woh:
📐 Take accurate roof measurements
☀️ Perform shading analysis
⚡ Calculate your exact load requirements
📊 Design the best system for you
Roman Urdu: Professional survey karwana bohat zaroori hai. Woh roof ki structure, shading, aur load — sab check kare ga aur aapko best system design de ga. 👨🔧
📝 Step 5: Prepare Documents 📂
For net metering, you will need these documents:
Roman Urdu: Net metering ke liye ye documents chahiye honge:
✅ CNIC (Original + 2 photocopies) 🪪
✅ Latest electricity bills (last 3-6 months) 🧾
✅ Property documents (registry / allotment letter) 🏠
✅ NOC (if rented house, from landlord) 📄
✅ Pictures of site / roof 📸
Roman Urdu: Yeh documents pehle hi tayyar kar lein taake net metering application mein delay na ho. Agar rented ghar hai to landlord se NOC lena na bhoolein! ⏰
🔌 Step 6: Check Your Grid Connection ⚡
Is your home connection single-phase or three-phase?
Roman Urdu: Aapke ghar ka connection single-phase hai ya three-phase?
Connection Type | Max System Size
Single-Phase | Up to 5-7 kW 🔌
Three-Phase | 10 kW+ 🔌🔌🔌
Roman Urdu: Agar single-phase connection hai to 5-7 kW se bada system nahi laga sakte. Bada system lage ga to three-phase upgrade karwana pare ga jiska extra cost Rs. 30,000-40,000 hai. 💰
👨🔧 Step 7: Select an AEDB Approved Vendor ✅
⚠️ IMPORTANT: Only install your system through an AEDB (Alternative Energy Development Board) approved vendor!
Roman Urdu: ⚠️ IMPORTANT: Sirf AEDB approved vendor se hi system lagwayein!
Why? 🤔
✅ Only AEDB approved vendors can submit net metering applications 📝
✅ Guarantees quality workmanship 🏆
✅ Warranty remains valid 📃
✅ No issues later with DISCO 🙌
How to check: Visit aedb.org and verify the vendor is approved.
Roman Urdu: AEDB approved vendor check karne ke liye aedb.org par jayein. Jo vendor AEDB approved nahi, uska application DISCO reject kar de gi. ❌
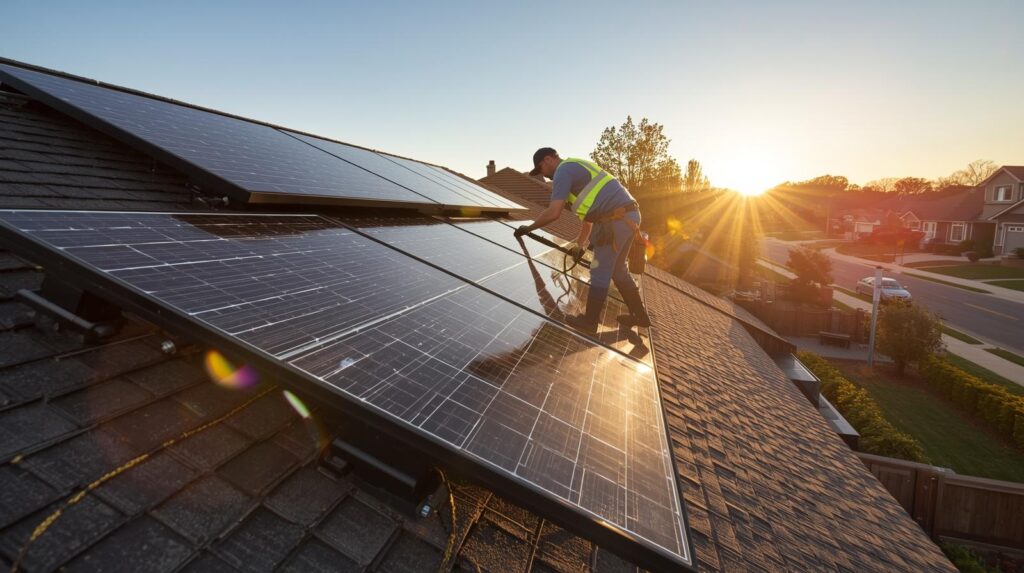
🔧 PART 2: STEP-BY-STEP INSTALLATION PROCESS 🏗️
Now that everything is ready, let’s see how a solar system is installed at home!
Roman Urdu: Ab jab sab kuch tayyar hai, chaliye dekhte hain ghar par solar system kaise install hota hai! 🚀
📅 Total Installation Time: 3-7 Days (Residential) ⏱️
Roman Urdu: Installation ka time 3-7 days lagta hai residential ke liye.
👷♂️ Day 1: Scaffolding and Safety Arrangements 🛡️
Step 1: Installers will come to your home and set up safety scaffolding.
Roman Urdu: Installers aapke ghar aayein ge aur safety scaffolding lagaen ge.
Why is this needed? 🤔
-
To work safely at height 🦺
-
To have space for panels and tools 🧰
-
For workers to move safely 🚶
Roman Urdu: Pehle din workers scaffolding lagate hain taake safely roof par kaam kar saken. Safety first! ⛑️
🔩 Day 1-2: Solar Panel Mounts Installation 🔨
Step 2: Now the mounting structure is installed on the roof.
Roman Urdu: Ab roof par mounting structure lagaya jata hai.
What is a mounting structure? 🤔
-
Iron or aluminum rails and brackets 📏
-
Panels are attached to these 🔲
-
Strongly fixed to the roof 🔩
Roman Urdu: Iron ya aluminum ki pattiyan hoti hain jin par panels lagte hain aur roof se strongly attached hoti hain.
Types of mounts: 📌
🔹 Rails: For rows of panels
🔹 Clamps: To hold panels in place
🔹 End clamps: For the last panel
🔹 Mid clamps: For panels in between
⚠️ Important: The mounting structure must be galvanized or aluminum to prevent rust!
Roman Urdu: ⚠️ Important: Mounting structure galvanized ya aluminum ka hona chahiye taake zang na lagay!
Roman Urdu: Mounting structure galvanized steel ya aluminum ka hona chahiye. Saste wale zang lag jaate hain aur 2-3 saal mein kharab ho jate hain. 😫
☀️ Day 2-3: Solar Panels Installation 🔲
Step 3: Now the panels are installed on the mounts.
Roman Urdu: Ab panels ko mounts par lagaya jata hai.
Process: 📋
-
Carefully lift panels to the roof 🏋️
-
Fix them to mounts using clamps 🔩
-
Secure each panel tightly ✅
-
Maintain proper gap between panels 📐
Roman Urdu:
-
Panels carefully roof par uthayein
-
Clamps ki madad se mounts par fix karein
-
Har panel ko tightly secure karein
-
Panels ke beech mein proper gap rakhein
Panel alignment tips: 💡
✅ Face panels south for maximum generation 🧭
✅ Maintain 30-35 degree tilt angle 📐
✅ Allow space for air flow between panels and roof 💨
✅ Ensure no shading from other panels ☀️
Roman Urdu: Panels lagate waqt yeh dekhna hai ke saare ek hi direction mein hon aur shade na pare. Panels ke neeche se hawa guzarne ki jagah honi chahiye taake panels garam na hon. 🌬️
⚡ Day 3-4: DC Wiring (Panels to Inverter) 🔌
Step 4: Panels are connected to each other and to the inverter.
Roman Urdu: Panels ko aapas mein aur inverter se connect kiya jata hai.
Wiring types: 📊
🔹 Series connection: Voltage increases ⚡
🔹 Parallel connection: Current increases 🌊
🔹 Series-Parallel: Combination of both 🔄
Roman Urdu:
🔹 Series connection mein voltage badhta hai
🔹 Parallel connection mein current badhta hai
🔹 Series-Parallel mein dono ka combination hota hai
Wire specifications: 📏
System Size | DC Wire Size | AC Wire Size
3 kW | 4 mm² – 6 mm² | 6 mm² – 10 mm²
5 kW | 6 mm² – 10 mm² | 10 mm² – 16 mm²
10 kW | 10 mm² – 16 mm² | 16 mm² – 25 mm²
⚠️ Important: Always use pure copper wires! Aluminum wires create fire risk.
Roman Urdu: ⚠️ Important: Sirf pure copper wires use karein! Aluminum wires se fire risk hota hai. 🔥
Components used: 🧰
✅ MC4 connectors — to connect panels
✅ DC cables — from panels to inverter
✅ DC breakers — for safety 🛡️
✅ Surge protection devices — protect from lightning ⚡
Roman Urdu:
✅ MC4 connectors — panels ko connect karne ke liye
✅ DC cables — panels se inverter tak
✅ DC breakers — safety ke liye
✅ Surge protection devices — lightning se bachao
Expert Tip: Always use solar-rated cables, not ordinary household wires.
Roman Urdu: Wiring mein copper wires use karein. Saste aluminum wires se resistance zyada hota hai, voltage drop hota hai aur fire ka khatra rehta hai. Solar-rated cables hi use karein, ordinary wires nahi. 🔥
🔌 Day 4-5: Inverter Installation 🧠
Step 5: The inverter is installed — this is the brain of your system!
Roman Urdu: Inverter ko install kiya jata hai — yeh system ka dimaag hai!
Where to place the inverter: 📍
✅ Cool and dry place ❄️
✅ Away from direct sunlight ☀️
✅ Proper ventilation 💨
✅ Near the load center (meter board) 📊
Roman Urdu:
✅ Cool and dry jagah
✅ Direct sunlight se door
✅ Ventilation ho
✅ Load center (meter board) ke paas
Installation process: 📋
-
Mount inverter on the wall 🧱
-
Connect DC input (from panels) ⚡
-
Connect AC output (to home loads) 🔌
-
Connect batteries (for hybrid systems) 🔋
-
Connect to grid (for on-grid systems) 🌐
Roman Urdu:
-
Inverter ko wall par mount karein
-
DC input (panels se) connect karein
-
AC output (ghar ke load se) connect karein
-
Battery connections (hybrid system mein)
-
Grid connection (on-grid system mein)
Expert Tip: Never install the inverter in a place that gets hot. Heat reduces efficiency and lifespan.
Roman Urdu: Inverter ko aisi jagah lagayein jahan hawa guzaray aur dhoop na aaye. Garam jagah par inverter ki efficiency kam ho jati hai aur life bhi kam ho jati hai. 🌡️
🔋 Day 5: Battery Bank Installation (Hybrid/Off-Grid) 🔋
Step 6: If you have batteries, they are installed now.
Roman Urdu: Agar batteries hain to ab install ki jati hain.
Battery placement: 📍
✅ Well-ventilated area 💨
✅ Room temperature 🌡️
✅ Proper spacing between batteries 📏
✅ Acid-proof flooring (for lead-acid) 🧱
Roman Urdu:
✅ Hawa guzarne ki jagah
✅ Room temperature
✅ Batteries ke beech mein faasla
✅ Acid-proof flooring (lead-acid ke liye)
Battery wiring: 🔌
-
Connect in series to increase voltage ⚡
-
Connect in parallel to increase capacity 🔋
-
Use proper gauge cables 📏
-
Install fuses and breakers 🛡️
Roman Urdu:
-
Series mein voltage badhta hai
-
Parallel mein capacity badhti hai
-
Proper gauge cables use karein
-
Fuses aur breakers install karein
⚠️ Safety: Batteries can cause short circuits. Only professionals should handle them!
Roman Urdu: ⚠️ Safety: Batteries se short circuit ka khatra hota hai. Professional hi handle karein!
Roman Urdu: Batteries ko aisi jagah rakhein jahan hawa guzaray. Lead-acid batteries se gas nikalti hai jo flammable hoti hai. Lithium batteries safe hain lekin mehngi hain. 💨
🔧 Day 6: Grid Connection and Metering 🌐
Step 7: The system is connected to the grid.
Roman Urdu: System ko grid se connect kiya jata hai.
For On-Grid systems: ☀️
-
Connect inverter to main distribution board 📊
-
Install bi-directional meter (green meter) 🟢
-
Test grid synchronization ✅
-
Configure net metering settings ⚙️
Roman Urdu:
-
Inverter ko main distribution board se connect karein
-
Bi-directional meter (green meter) install karein
-
Grid synchronization test karein
-
Net metering settings configure karein
For Off-Grid systems: 🏝️
-
Inverter directly feeds the load 🔌
-
No grid connection required 🚫
Roman Urdu:
-
Inverter load directly feed karta hai
-
Grid connection ki zaroorat nahi
For Hybrid systems: 🔄
-
Both grid and battery connections 🔋🌐
-
Configure priority settings ⚙️
Roman Urdu:
-
Grid aur battery dono connections hote hain
-
Priority settings configure ki jati hain
Roman Urdu: On-grid system mein inverter ko ghar ke main board se connect karte hain aur green meter laga kar net metering enable karte hain. Is ke baad jo extra bijli banti hai wo grid ko bech sakte hain. 💰
🧪 Day 6-7: Testing and Commissioning ✅
Step 8: The complete system is tested.
Roman Urdu: Pura system test kiya jata hai.
Tests performed: 📋
✅ Continuity test: Are wires properly connected? 🔌
✅ Insulation resistance test: Any leakage current? ⚡
✅ Earth resistance test: Is earthing proper? 🌍
✅ Polarity test: Are +ve/-ve connections correct? ✅
✅ Voltage/Current test: Is output as expected? 📊
✅ Grid synchronization: Is on-grid system syncing properly? 🔄
✅ Battery charging/discharging: For hybrid/off-grid systems 🔋
Roman Urdu:
✅ Continuity test: Wiring theek hai?
✅ Insulation resistance test: Koi leakage toh nahi?
✅ Earth resistance test: Earthing theek hai?
✅ Polarity test: Connections sahi hain?
✅ Voltage/Current test: Output theek aa raha?
✅ Grid synchronization: On-grid system sahi sync hai?
✅ Battery charging/discharging: Hybrid/off-grid mein
Roman Urdu: Testing bohat important hai. Har connection check kiya jata hai, voltage aur current measure kiya jata hai, aur system performance verify ki jati hai. Tests ke baad hi system use karna chahiye. 👨🔧
⚡ PART 3: SOLAR SYSTEM WIRING GUIDE (Technical Details) 🔧
If you want to understand the technical details, this section is for you!
Roman Urdu: Agar aap technical details samajhna chahte hain to yeh section aapke liye hai! 📚
🔌 Solar Panel Wiring Configurations 🔗
-
Series Connection 🔗
Panel 1 (+) — Panel 2 (+) — Panel 3 (+) — Inverter (+)
Panel 1 (-) — Panel 2 (-) — Panel 3 (-) — Inverter (-)
✅ Advantage: Voltage increases (adds up) — good for long wire runs ⚡
❌ Disadvantage: Current remains same — if one panel is shaded, whole string affected 🌊
Roman Urdu:
✅ Faida: Voltage badhta hai — long wire runs ke liye acha hai
❌ Nuqsan: Current same rehta hai — ek panel par shade ho to poori string affected
-
Parallel Connection 🔀
Panel 1 (+)
Panel 2 (+) — Combiner Box — Inverter (+)
Panel 3 (+)
Panel 1 (-)
Panel 2 (-) — Combiner Box — Inverter (-)
Panel 3 (-)
✅ Advantage: Current increases — shading doesn’t affect whole system 🌊
❌ Disadvantage: Voltage remains same — needs thicker wires 📏
Roman Urdu:
✅ Faida: Current badhta hai — shading se poori system affected nahi hoti
❌ Nuqsan: Voltage same rehta hai — moti wires chahiye
-
Series-Parallel (String Inverters) 🔄
-
Create strings of panels (series connection) 🔗
-
Combine strings in parallel 🔀
Roman Urdu:
-
Panels ki strings banayi jati hain (series) 🔗
-
Strings ko parallel mein combine kiya jata hai 🔀
Expert Tip: For small systems, series connection is common. For large systems, strings are made and connected in parallel. Let a professional decide the best configuration.
Roman Urdu: Chote systems mein series connection common hai. Bade systems mein strings banakar parallel connect karte hain. Professional electrician hi decide kare ga kaunsa configuration best rahe ga. 👨🔧
🔧 AC Side Wiring (Distribution Board) 📊
From Solar Inverter to Distribution Board: 🔌
Solar Inverter → AC Breaker → Distribution Board → Home Loads
↓
Grid Meter → Grid
Components required: 🧰
✅ AC Breaker: Dedicated breaker for inverter 🔌
✅ Surge Protection Device (SPD): Protection from lightning and surges ⚡
✅ Changeover Switch: For manual switching (off-grid/hybrid) 🔄
✅ Earthing: Proper grounding is essential 🌍
Roman Urdu:
✅ AC Breaker: Inverter ke liye dedicated breaker
✅ Surge Protection Device (SPD): Lightning aur surges se bachao
✅ Changeover Switch: Manual switching ke liye (off-grid/hybrid)
✅ Earthing: Proper grounding zaroori
Roman Urdu: AC side wiring mein proper breaker aur SPD lagaen. Earthing bohat important hai — agar earthing theek nahi to safety hazard ho sakta hai. ⚠️
⚡ Earthing/Grounding Requirements 🌍
Proper earthing is essential for solar systems in Pakistan:
Roman Urdu: Pakistan mein solar system ke liye proper earthing zaroori hai:
System Size | Earth Resistance | Earth Electrodes
Up to 5 kW | < 4 Ω | 2 (panel array + inverter)
5-10 kW | < 2 Ω | 3-4
10 kW+ | < 1 Ω | 4+
Earthing types: 📌
🔹 Panel frames earthing: All panels interconnected and earthed 🔲
🔹 Inverter earthing: Inverter body earthed 🧠
🔹 Lightning arrestor: Optional but recommended in open areas ⚡
Roman Urdu:
🔹 Panel frames earthing: Saare panels interconnected aur earthed
🔹 Inverter earthing: Inverter body earthed
🔹 Lightning arrestor: Open areas mein recommended hai
Expert Tip: Don’t take earthing lightly. Proper earthing protects against lightning strikes and electrical faults. Lower earth resistance means better protection.
Roman Urdu: Earthing ko light mat lein. Proper earthing se lightning strike aur electrical faults mein protection milti hai. Earth resistance jitna kam, utna better. 👍
📝 PART 4: NET METERING APPLICATION 2026 (Step-by-Step) 📋
⚠️ IMPORTANT UPDATE: In February 2026, NEPRA implemented new Prosumer Regulations!
Roman Urdu: ⚠️ IMPORTANT UPDATE: February 2026 mein NEPRA ne naye Prosumer Regulations implement kar diye hain! 🆕
🔄 What Changed in 2026? 🔄
Parameter | Old System (Before 2026) | New System (2026)
Export Rate | Rs. 22-27 per unit | Rs. 11-13 per unit 📉
Agreement Duration | 7 years | 5 years ⏱️
License Required | Above 1 MW | Above 25 kW 📊
Processing Time | 30-60 days | 15-30 days (below 25 kW) ⚡
Important Note: Existing users (who installed before 2026) continue under old rules until their agreement expires.
Roman Urdu: 2026 mein policy change ho gayi hai. Export rate pehle Rs. 26 tha, ab Rs. 11-13 hai. Agreement 5 saal ka ho ga. Lekin existing users par old rules apply hote hain jab tak agreement expire nahi hota. 📢
📋 Net Metering Application Process (7 Steps) 📝
Step 1: Select AEDB Approved Vendor ✅
⚠️ Only AEDB-approved vendors can submit applications
Roman Urdu: ⚠️ Sirf AEDB-approved vendors hi application submit kar sakte hain
How to check: 🔍
-
Go to aedb.org 💻
-
Check “Registered Vendors” list 📋
-
Verify vendor is active and approved ✅
Roman Urdu:
-
aedb.org par jayein
-
“Registered Vendors” list check karein
-
Verify karein ke vendor active aur approved hai
Roman Urdu: Pehla aur sab se important step — AEDB approved vendor select karna. Agar vendor approved nahi to DISCO application reject kar de gi. ❌
Step 2: Collect Documents 📂
Document | Details
CNIC copies | Owner’s CNIC (front + back) 🪪
Electricity bills | Last 3 months 🧾
Property documents | Registry / Allotment / Mutation 🏠
NOC | If rented property, from landlord 📄
Technical documents | Single-line diagram, equipment specs 📊
Vendor docs | AEDB cert, company registration, NTN 📋
Roman Urdu:
CNIC copies — Malik ka CNIC (front + back)
Electricity bills — Pichlay 3 maheenay ke
Property documents — Registry / Allotment / Mutation
NOC — Agar rented property hai to landlord se
Technical documents — Single-line diagram, equipment specs
Vendor docs — AEDB cert, company registration, NTN
Roman Urdu: Saare documents collect kar lein aur vendor ko de dein. Woh complete application package tayyar kare ga. 📁
Step 3: Submit Application to DISCO 📨
The vendor will submit your application to DISCO’s DG (Distributed Generation) cell.
Roman Urdu: Vendor aapki application DISCO ke DG cell mein submit kare ga.
Timeline: 1-2 days ⏱️
Fee structure 2026: 💰
System Size | Application Fee
Below 20 kW | Free 🆓
20-50 kW | Rs. 500 – 1,000
50-100 kW | Rs. 1,000 – 2,000
100-250 kW | Rs. 2,000 – 5,000
Step 4: Initial Screening & Technical Review 🔍
DISCO will check the application:
Roman Urdu: DISCO application check kare gi:
✅ Are all documents complete? 📄
✅ Is system size within sanctioned load? 📊
✅ Do equipment specifications meet standards? ✅
✅ Is the single-line diagram correct? 📐
Timeline: 5-10 days ⏱️
Roman Urdu: DISCO pehle check kare gi ke saare documents mukammal hain. Agar koi kami ho gi to woh vendor ko inform kare gi. 📢
Step 5: Site Inspection 👨🔧
DISCO’s technical team will inspect your site:
Roman Urdu: DISCO ka technical team aapki site inspect kare ga:
✅ Are panels correctly installed? 🔲
✅ Is wiring according to standards? 🔌
✅ Are safety equipment installed? 🛡️
✅ Is meter location accessible? 📍
Timeline: 5-7 days after technical approval ⏱️
Roman Urdu: DISCO ka team site aa kar physically inspect kare ga ke installation theek hai ya nahi. Agar sab sahi ho ga to approval mil jaye gi. ✅
Step 6: Green Meter Installation 🟢
After inspection passes:
Roman Urdu: Inspection pass hone ke baad:
✅ Old meter is removed ❌
✅ New bi-directional (green) meter is installed 🟢
✅ Meter is sealed 🔒
✅ Commissioning report is prepared 📄
Green Meter Cost: Rs. 40,000 – 50,000 💰
Timeline: 7-15 days after inspection ⏱️
Roman Urdu: Green meter wo meter hai jo dono taraf count karta hai — grid se li gayi bijli bhi aur grid ko bheji gayi bijli bhi. Isi meter se net billing hoti hai. 🔄
Step 7: Sign Net Metering Agreement 📝
Final step:
Roman Urdu: Final step:
✅ Sign the agreement (5 years duration) ✍️
✅ Keep a copy of the agreement 📄
✅ System becomes active ✅
Timeline: 1-2 days after meter installation ⏱️
Total Timeline: ⏱️
System Size | Total Time
Below 25 kW | 15-30 days
25-50 kW | 60-75 days
50-100 kW | 60-90 days
100-250 kW | 75-105 days
Roman Urdu: Chote systems (25 kW se kam) ka approval 1 month mein ho jata hai. Bade systems mein NEPRA license bhi chahiye jis mein 2-3 months lagte hain. 📅
🛠️ PART 5: TESTING & COMMISSIONING (Final Checks) ✅
After installation, these final tests must be performed:
Roman Urdu: Jab system install ho jaye to ye final tests zaroor karayein: 🔍
✅ Electrical Tests ⚡
Test | What It Checks | Acceptable Value
Continuity Test | Are wires properly connected? | Beep on multimeter 📢
Insulation Resistance | Any leakage current? | > 1 MΩ ✅
Earth Resistance | Is earthing proper? | < 4 Ω (5 kW), < 2 Ω (10 kW) 🌍
Polarity Test | Are +ve/-ve connections correct? | Correct polarity ✅
Open Circuit Voltage | Panel voltage | As per datasheet 📊
Short Circuit Current | Panel current | As per datasheet 📊
Roman Urdu:
Continuity Test: Wires sahi connected hain? — Multimeter par beep
Insulation Resistance: Koi leakage current? — > 1 MΩ
Earth Resistance: Earthing theek hai? — < 4 Ω (5 kW), < 2 Ω (10 kW)
Polarity Test: +ve/-ve sahi hain? — Correct polarity
Open Circuit Voltage: Panel voltage — As per datasheet
Short Circuit Current: Panel current — As per datasheet
📊 Performance Tests 📈
✅ String voltage check: Each string should have same voltage ⚡
✅ Inverter display: Voltage, current, power should show correctly 📱
✅ Grid synchronization: On-grid system should sync properly 🔄
✅ Battery charging/discharging: For hybrid systems 🔋
Roman Urdu:
✅ String voltage check: Har string ka voltage same hona chahiye
✅ Inverter display: Voltage, current, power showing hona chahiye
✅ Grid synchronization: On-grid system sahi sync ho raha?
✅ Battery charging/discharging: Hybrid system mein
📱 Monitoring Setup 📲
✅ Set up inverter monitoring app 📱
✅ Connect via WiFi or Ethernet 🌐
✅ Enable remote monitoring 📡
✅ Set alerts (low generation, faults, etc.) 🔔
Roman Urdu:
✅ Inverter monitoring app setup karein
✅ WiFi ya Ethernet connect karein
✅ Remote monitoring enable karein
✅ Alerts set karein (low generation, faults, etc.)
Expert Tip: After tests, definitely set up monitoring. Through the app, you can see on your mobile how much electricity is being generated, how much is being exported, and if the system is running properly.
Roman Urdu: Tests ke baad monitoring setup zaroor karein. App ke through aap mobile par dekh sakte hain ke kitni bijli ban rahi hai, kitni export ho rahi hai, aur system sahi chal raha hai ya nahi. 📊
🧹 PART 6: MAINTENANCE TIPS (Solar System Ki Dehkaal) 🧽
Maintaining a solar system is very easy. Do these 5 things regularly:
Roman Urdu: Solar system ko maintain rakhna bohat asaan hai. Ye 5 cheezein regular karein: 📋
🧼 1. Panel Cleaning 💧
Season | Cleaning Frequency
Summer (dusty) | Every 10-15 days 🔥
Winter | Every 20-30 days ❄️
Rainy | After heavy rain (if dusty) ☔
After storms | Immediately 🌪️
Roman Urdu:
Season | Safai Ki Frequency
Summer (dusty) | Har 10-15 din mein
Winter | Har 20-30 din mein
Rainy | Tez barish ke baad (agar gard ho)
After storms | Foran
Cleaning method: 🧽
✅ Use soft cloth or sponge
✅ Clean with normal water 💧
✅ Clean in morning or evening (when panels are cool) 🌅
✅ Never use hard brushes that can scratch ❌
❌ Avoid: Don’t pour water on hot panels, don’t use detergent, don’t use pressure washer 🚫
Roman Urdu:
✅ Soft cloth ya sponge use karein
✅ Normal paani se saaf karein
✅ Morning ya evening time clean karein (panels thande hon)
✅ Deeper scratch karne wale brushes use na karein
❌ Avoid: Hot panels par paani na daalein, detergent na use karein, pressure washer na use karein
Roman Urdu: Panels ki safai zaroori hai. Dust ki wajah se 15-20% output kam ho jata hai. Soft cloth aur paani se saaf karein, kabhi bhi detergent ya hard brush na lagaen. 🧼
🔍 2. Visual Inspection (Monthly) 👀
Every month, check these:
Roman Urdu: Har mahine ye check karein:
✅ Any cracks in panels? 🔲
✅ Is wiring okay? Any loose connections? 🔌
✅ Is mounting structure tight? 🔩
✅ Are junction boxes closed? 📦
✅ Any new shade appearing? 🌳
Roman Urdu:
✅ Panels mein koi crack toh nahi?
✅ Wiring theek hai? Koi khula connection?
✅ Mounting structure mazboot hai?
✅ Junction boxes band hain?
✅ Koi shade toh nahi aa raha?
Roman Urdu: Mahine mein ek baar panels ko dekh lein. Koi crack hai, wiring theek hai, mounting loose toh nahi — ye sab check kar lena chahiye. 👁️
🔋 3. Battery Maintenance (If Applicable) 🔋
Lead-Acid Batteries: 🔋
✅ Check water (distilled) every 2-3 months 💧
✅ Keep terminals clean (apply Vaseline) 🛢️
✅ Ensure proper ventilation 💨
✅ Check specific gravity with hydrometer 📊
Roman Urdu:
✅ Pani (distilled water) har 2-3 mahine mein check karein
✅ Terminals saaf rakhein (Vaseline lagaen)
✅ Ventilation theek rakhein
✅ Specific gravity check karein (hydrometer se)
Lithium Batteries: ⚡
✅ Almost maintenance-free ✅
✅ Check BMS (Battery Management System) 📱
✅ Monitor temperature 🌡️
✅ Keep connections tight 🔩
Roman Urdu:
✅ Almost maintenance-free
✅ BMS (Battery Management System) check karein
✅ Temperature monitor karein
✅ Connections tight rakhein
Roman Urdu: Lead-acid batteries mein pani dalna parta hai har 2-3 mahine mein. Lithium batteries mein pani nahi dalna parta, wo almost maintenance-free hain. 👍
📊 4. Performance Monitoring (Daily/Weekly) 📱
✅ Check inverter display or app daily 📲
✅ Monitor daily generation 📈
✅ Investigate sudden drops in output 🔍
✅ Compare with historical data 📊
✅ Check for fault codes ⚠️
Roman Urdu:
✅ Inverter display ya app check karein
✅ Daily generation monitor karein
✅ Sudden drop in output ko investigate karein
✅ Compare with historical data
✅ Fault codes check karein
Roman Urdu: Rozana 5 minute nikaal kar inverter display ya app check kar lein. Agar achanak generation kam ho gayi to reason investigate karein — shade ho sakta hai, ya cleaning zaroori ho. 🕵️
👨🔧 5. Professional Maintenance (Annual) 📅
Get professional servicing every year:
Roman Urdu: Har saal professional servicing karwayein:
✅ Full system checkup ✅
✅ All connections tightening 🔩
✅ Earthing testing 🌍
✅ Insulation testing ⚡
✅ Inverter firmware update (if needed) 📱
✅ Battery health check 🔋
Roman Urdu:
✅ Full system checkup
✅ All connections tightening
✅ Earthing testing
✅ Insulation testing
✅ Inverter firmware update (if needed)
✅ Battery health check
Roman Urdu: Saal mein ek baar professional servicing zaroor karwa lein. Woh poore system ko check kare ga aur jo bhi issues honge unhe fix kar de ga. 👨🔧
❌ PART 7: COMMON INSTALLATION MISTAKES (Inse Bacho!) 🚫
These are 10 common mistakes people make. Avoid them to save your investment!
Roman Urdu: Yeh 10 common mistakes hain jo log karte hain. In se bach kar aap apni investment save kar sakte hain! 💰
❌ Mistake 1: Only Looking at Cheap Price 💸
Problem: People only look at price, not quality. They buy cheap panels and inverters that fail in 2-3 years. 😫
Solution: Choose quality brands. Panels: Jinko, Longi, Canadian, Trina, JA Solar. Inverter: Sungrow, Solis, Growatt, Deye, Sofar. 🏆
Roman Urdu: Sirf sasta nahi dekho, quality bhi dekho. Ache brands ke panels 25 saal chalte hain, saste 5 saal mein kharab ho jate hain. 💪
❌ Mistake 2: Unqualified Installer 👨🔧❌
Problem: Got system installed by someone not AEDB approved. Net metering gets rejected. 😭
Solution: Only work with AEDB approved vendors. Check at aedb.org 💻
Roman Urdu: AEDB approved vendor check karna mat bhoolna. Jo vendor approved nahi, uska application DISCO reject kar de gi. 🚫
❌ Mistake 3: Wrong System Sizing 📏❌
Problem: Decided system size without load calculation. Either too small or too large. 😕
Solution: Get professional load calculation. Look at last 12 months bills to decide size. 📊
❌ Mistake 4: Ignoring Shading Analysis 🌳❌
Problem: Didn’t check for shade. Trees or buildings reduce panel output. 😫
Solution: Get professional shading analysis. Use microinverters or optimizers if shading issue exists. ✅
❌ Mistake 5: Cheap Wiring 🔌❌
Problem: Used aluminum wires or local quality wires. Voltage drop, fire risk. 🔥
Solution: Use pure copper, solar-rated cables. Use proper gauge wires. ✅
❌ Mistake 6: Poor Earthing 🌍❌
Problem: Didn’t do proper earthing. System can be damaged by lightning or faults. ⚡
Solution: Get proper earthing. Test earth resistance. Install lightning arrestor in open areas. ✅
❌ Mistake 7: Wrong Inverter Placement 📍❌
Problem: Placed inverter where sun hits or no ventilation. Inverter overheats. 🔥
Solution: Place inverter in cool, shaded, ventilated area. Protect from direct sunlight. ❄️
❌ Mistake 8: Delay in Net Metering Documents 📄❌
Problem: Delayed collecting documents for net metering. Process started late. ⏰
Solution: Prepare documents in advance. Submit to vendor quickly. ✅
❌ Mistake 9: Not Checking Warranty 📃❌
Problem: Didn’t check warranty. When something failed, found no warranty. 😫
Solution: Check warranty of each component. Get warranty cards. 📄
❌ Mistake 10: No After-Sales Service 📞❌
Problem: Installer promised service but doesn’t answer when needed. 😤
Solution: Get service agreement in writing. Check installer’s track record. ✅
❓ PART 8: FREQUENTLY ASKED QUESTIONS (Real Pakistani Scenarios) 🙋
Q1: How much time does solar installation take? ⏱️
A: Installation takes 3-7 days for residential. Net metering approval takes additional 15-30 days (for systems below 25 kW). 📅
Roman Urdu: Panels lagne mein 3-7 din lagte hain. Net metering ka approval 1 month mein ho jata hai chote systems ke liye. ✅
Q2: Can solar system run AC? ❄️
A: Yes! 1.5 ton AC needs approximately 1.5-2 kW power. A 5 kW system can easily run 2-3 ACs during daytime. ❄️❄️❄️
Roman Urdu: Bilkul chalta hai. 5 kW ka system 2-3 ACs chala sakta hai. Bas system size according to load rakhna chahiye. 👍
Q3: Is battery necessary? 🔋
A: Not necessary. If your area has no or little load-shedding, on-grid (without battery) is best. If load-shedding exists, go for hybrid or off-grid with battery.
Roman Urdu: Battery zaroori nahi. Load-shedding nahi to on-grid lo, sasta hai. Load-shedding hai to hybrid lo.
Q4: Is solar profitable under 2026 new policy? 💰
A: Absolutely profitable. Export rate has decreased but payback period is still 3-4 years. And the system runs for 25+ years.
Roman Urdu: Haan, profitable hai. Export rate kam hai lekin savings ab bhi bohat hain. 3-4 saal mein system ka paisa wapas aa jata hai.
Q5: How many kW can I install on single-phase? ⚡
A: On single-phase connection, you can install up to 5-7 kW maximum. For larger systems, you’ll need to upgrade to three-phase.
Roman Urdu: Single-phase par 5-7 kW tak laga sakte hain. Bada system lage ga to three-phase karwana pare ga.
Q6: What is the life of solar panels? 🌱
A: Good quality panels last 25-30 years. Performance guarantee is 25 years (80% output).
Roman Urdu: Ache panels 25-30 saal chalte hain. 25 saal baad bhi 80% output dete hain.
Q7: Can solar system make my bill zero? 📉
A: With net metering, your bill depends on the balance between generation and consumption. If you generate as much as you consume, bill can be zero or very low.
Roman Urdu: Bill zero ho sakta hai agar aap daytime mein maximum generation use kar lein. Export kam rate par milta hai is liye daytime consumption maximize karna chahiye.
Q8: What warranty comes with solar system? 📃
A:
-
Panels: 10-12 years product warranty, 25 years performance warranty
-
Inverter: 5-10 years (extendable)
-
Battery: 2-3 years (lead acid), 5-10 years (lithium)
-
Installation: 1-2 years
Roman Urdu:
-
Panels: 10-12 saal product warranty, 25 saal performance warranty
-
Inverter: 5-10 saal (extendable)
-
Battery: 2-3 saal (lead acid), 5-10 saal (lithium)
-
Installation: 1-2 saal
Q9: How often should panels be cleaned? 🧼
A: In summer (dusty season), every 10-15 days. In winter, every 20-30 days. After storms, immediately.
Roman Urdu: Summer (dusty season) mein har 10-15 din mein. Winter mein har 20-30 din mein. Storms ke baad foran.
Q10: Can I add more panels later? 🔲
A: Yes, but check your inverter capacity first. Inverters have maximum input limits. You may need a larger inverter or a second inverter.
Roman Urdu: Haan, lekin pehle inverter capacity check karein. Inverters ki maximum input limit hoti hai. Aap ko bada inverter ya doosra inverter lagna par sakta hai.
🏁 FINAL SUMMARY 💡
Installing a solar system in Pakistan in 2026 is a smart investment:
✅ Electricity prices at Rs. 55+ per unit — among the highest in the region
✅ System costs: Rs. 45-52 per watt (on-grid)
✅ New net billing policy — export rate lower but savings still significant
✅ Payback period: 3-4 years, then 20+ years of free electricity
✅ Best time to invest: NOW, because tariffs will only increase
Roman Urdu Final Advice:
Dosto, solar ek long-term investment hai — jaise ghar khareedna. Saari zindagi free bijli. Lekin sahi planning karein, quality parts choose karein, aur approved installer se kaam karwain. Agar aap ka bill 10,000 se zyada hai to solar lagwana aapke liye fayde mand hai. Jitna jaldi lagwao ge, utna jaldi bachat shuru ho gi.
Still have questions? Apna monthly bill, city, aur requirement comment mein batayein — hum guide karein ge ke aapke liye kaunsa system best rahe ga! 💬